Roller Shutter
installation guide
Installing roller shutters has been made effortless
We would like to offer you a clear and concise set of instructions for installing your unique roller shutters. Your customized kit is designed to be extremely simple to use, so take pleasure in the experience of effortlessly clicking, sliding, and locking the parts together.
Tools you’ll need to install
- Drill
- Hammer
- 10mm drill bit
- 05mm drill bit
- 05 or 06mm masonry drill bit.
(Depending on the wall plug size chosen) and screws to suit. For timber framed windows, just screws.
Step 1
Mark the top horizontal position of the roller shutters on the wall above the window. On this line mark the width of the shutter. From these two marks, vertically level down each side of the window. You will now have the outline of the roller shutter marked on the wall. At this stage, you can check that the roller shutter is central to the window and is exactly horizontal and vertical. THIS IS MOST IMPORTANT!
HARD-WIRED ELECTRIC MOTORS ONLY
With the outline of the roller shutter now marked on the wall, you can now decide the best point of entry for the main power and pre-drill the hole before installing.
IN REVEAL
Basically the same principle, but your window is your horizontal and vertical position. Still, check that they are exactly horizontal and vertical. THIS IS MOST IMPORTANT!
Step 2
Measure the depth of the head box, then from the top horizontal position of the roller shutter which you have marked on the wall, measure this distance down each side. This will then give you the position of the top of the guide on each side of the window. For in reveal roller shutters you can now cut the guide to the exact length, and angle of the sill.
Step 3
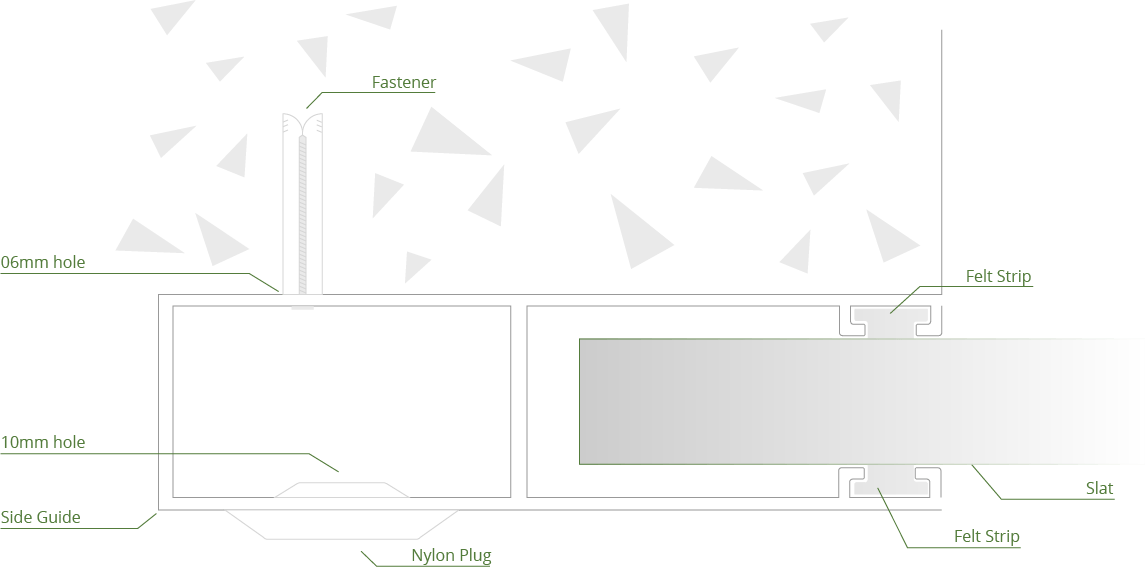
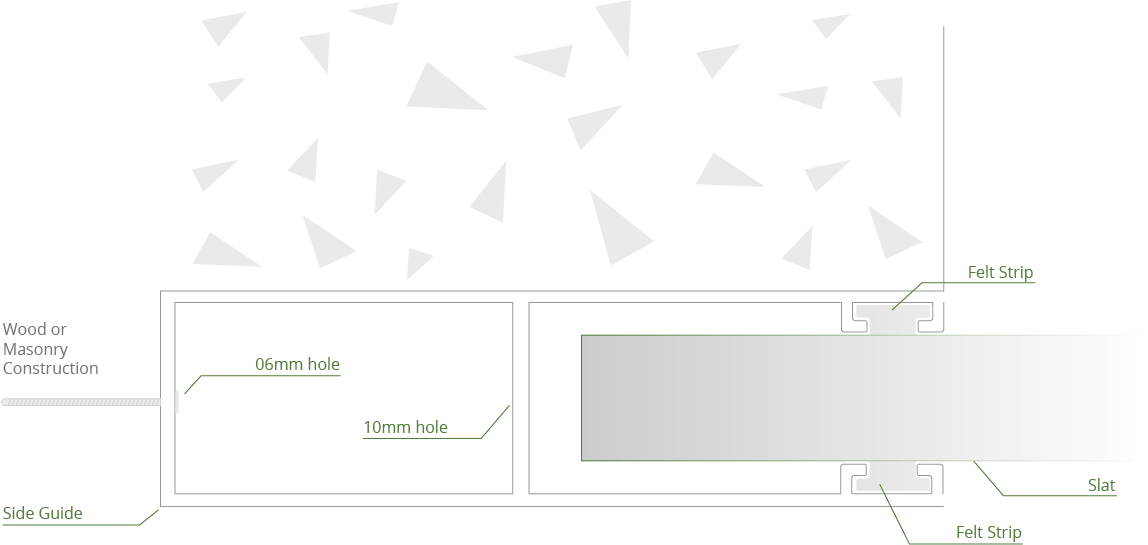
Hold the guide in the two positions marked. Top of the guide position (as in step 2) and the vertical guide position (as in step 1). You can now mark the best position to fix the guide to the wall, and these marks can be transferred to the other side guide. You can now drill through the front and back of the guide, the drill size is determined by the size of the screw you use. The front of the guide will need a 10mm hole, in which the 10mm coloured hole plugs are inserted, this then covers up the fixing points.
IN REVEAL
The fixing holes are drilled from the curtain side 10mm to the outside 05mm.
You will need a 10mm coloured plug.
On Wall Mounting

In Reveal Mounting

ODS BATTERY OPERATED ONLY
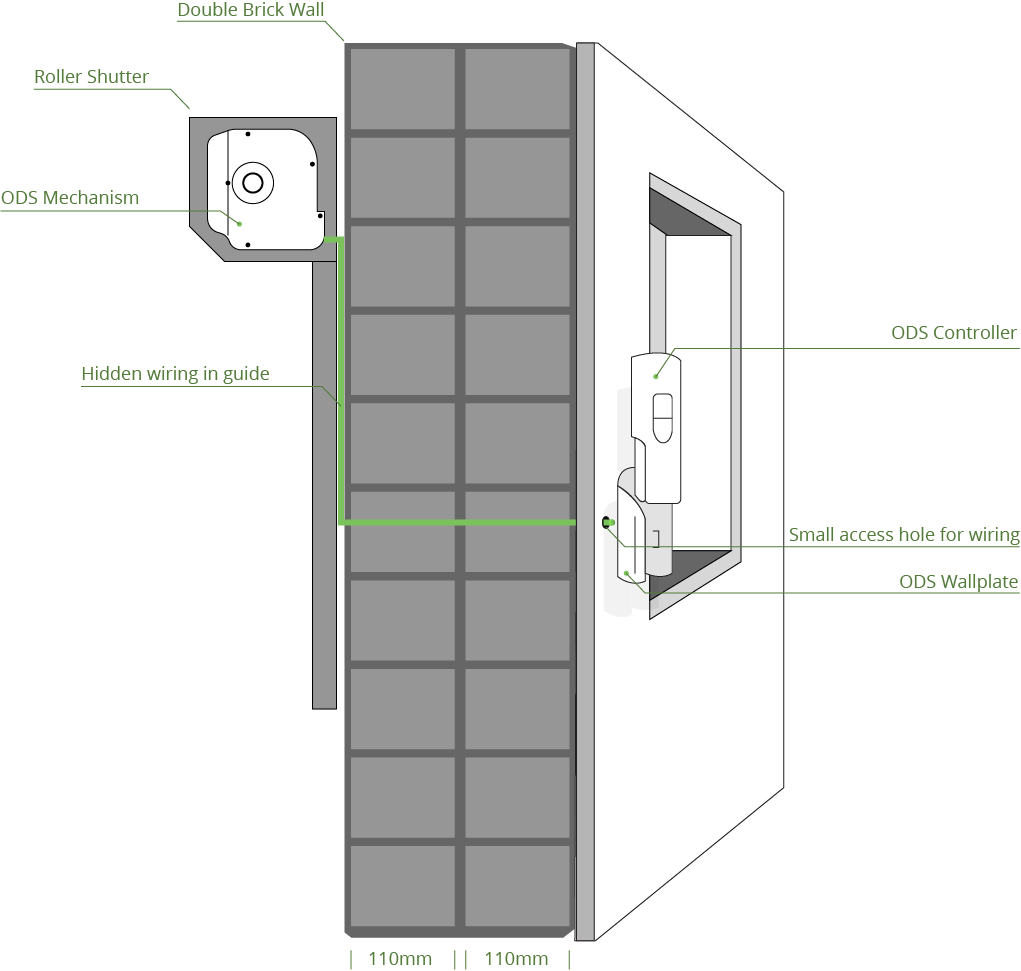
From the inside of the house find the desired position of the controller, then transfer the position to the outside wall behind the guide. Then drill through the wall. This hole is for the cable to the wall plate as shown below.

Step 4
The headbox has pre-drilled holes to attach the head box cover after installation. The guide legs can now be slid into position, (die-cast legs that fit onto the bottom corner of each side of the head box, and connect the main assembly to the roller shutter guides, remove the rubber rings first). Then slide the roller shutter guides on each side leg. Carefully place the roller shutter on the outline of the roller shutter marked on the wall and mark your fixing points. Then drill and plug the wall if masonry; if it is a timber wall, just a pilot hole to suit the fixing screws.
ODS BATTERY OPERATED ONLY
On the back of the guide drill a 10mm hole to allow the motor cable to exit the guide and enter the home.
Step 5
Carefully place the roller shutter next to the window. Then;
HARD-WIRED ELECTRIC MOTORS ONLY
Feed the cable from the motor through the hole you have pre drilled in step 1, this will help the electrician.
ODS BATTERY OPERATED ONLY
Insert a piece of wire through the cable hole in the wall, then attach the cable from the roller shutter to the wire and start pulling the cable into the house. Raise the roller shutter to the outline of the roller shutter marked on the wall and then screw the roller shutter to the wall.
ON WALL INSTALLATION
Then insert the 10mm coloured guide plugs.
Please note: The curtain will not move until the motor has power to turn the axle. If the shutter height limit is not set correctly, the bottom bar of the curtain has a bottom bar V stopper on each side, which stops the curtain from going completely into the head box, but this causes the motor to jam and stop, this should be avoided and the up limit set to stop the curtain before this happens.
ODS BATTERY OPERATED ONLY
The cable can now be clipped to the wall plate, and fixed to the wall. When the controller is fully charged, place it in the wall plate and check the operation of the curtain. If the curtain runs in the opposite direction to the indicated arrow, swap the wires around on the wall plate.
Standard roller shutters under four squared metres in size are fitted with the L10 battery motor. This motor is pre-set in the factory and will automatically stop at the fully closed and open positions.
If your roller shutter is over four squared metres in size it will be fitted with the T20 battery motor. The limits are not set by the factory, but a tool is provided with each motor so you can set the up and down end limits.
When adjusting the limits setting screw the plus (+) will add travel and the minus (-) will reduce travel.
Setting up and down end limits
To set the down and top stop limits of your roller shutters, you may need to rotate the limit screw on the motor head up to 30 times. It’s recommended to have two people during this process – one person stationed near the stop button on the controller inside the house, and the other person adjusting the down stop limit screw until the curtain stops in the correct position.
To ensure that the top stop limit is properly set, stop the curtain two slats down from the bottom of the head box using the limit screw adjustment, and then adjust the curtain height again by using the limit screw adjustment to stop the curtain 3 cm from the bottom of the head box.
It’s important to set the height correctly to avoid the motor jamming and stopping due to the bottom bar V stopper on each side of the curtain, which prevents it from going completely into the head box. Instead, the up limit should be set to stop the curtain before this happens.
When the curtain is in the down position you will be able to fix the head box to the wall, this should be done on each side through the head box end plate. Then rivet the head box cover on and you are done.
Well done, you did it
What do you think about sharing a photo of your project and tagging us?
Thanks for choosing Shutters4U.
If you still have any questions, please give us a call or send us a message
Frequently Asked Questions
Roller Shutters
What are roller shutters?
Roller shutters are a type of window or door covering that consists of horizontal slats or panels hinged together. These slats are typically made of aluminium or steel, although other materials like PVC or wood may also be used. The shutters are mounted above the window or door opening and can be manually or motor-operated.
What are the advantages of roller shutters?
Overall, roller shutters offer a range of advantages for your home, including enhanced security, privacy, light and noise control, energy efficiency, weather protection, and ease of maintenance. They can be a valuable addition to any property, providing numerous benefits to you and your loved ones.
Can roller shutters make a room completely dark?
Roller shutters can significantly reduce the amount of light entering a room. Keep in mind that the darkness level will depend on various factors like the material and design of the shutters, the installation method, and if there are any gaps or light leaks around the edges.
Are roller shutters secure?
Nowadays roller shutters are considered one of the most secure options for windows and door coverings. That’s because of the extra layer of protection that makes it more difficult for intruders to gain access to your home or commercial property.
However, to keep your home safe with roller shutters, we always suggest ensuring proper installation, regular maintenance, and use of other security measures in combination with security roller shutters, such as alarms, motion sensors, and reinforced entry points, to enhance the overall security of your property.
Do roller shutters provide insulation for your home?
Yes, roller shutters can provide insulation for your home and contribute to energy efficiency as they act as an additional insulating layer on windows and doors. In fact, in colder seasons, roller shutters can help retain heat inside the house, while in hot weather, they can block out heat from entering.
By investing in high-quality roller shutters from shutters4u, you can boost their insulation properties and enjoy the benefits of improved energy efficiency and indoor comfort.
How to clean roller shutters at home?
Cleaning roller shutters at home is an easy process. All you need to do is to wash them with soft soap and scrub them with a sponge or microfibre cloth. Before that, ensure the shutters are closed to clean their interior and exterior. Also, first, remove any debris or dust from their surface.
Remember, regular cleaning and maintenance of roller shutters will help keep them in good condition and prolong their lifespan.
Where can be roller shutters installed?
The versatility and customizable nature of roller shutters make them suitable for various applications, and they can be tailored to fit your specific needs and requirements. Just to mention some examples, roller shutters are usually installed in windows, doors, shopfronts, warehouses, industrial buildings and more.
What roller shutter colours are available in shutters4u?
We have a brilliant colour palette available for shutters in Australia, starting from the classics to the ones that deck up pretty well with your space. Our team also offers customization in terms of colours and brings different combinations for your home or business space. You name it, and we provide it.
If you need ideas for what colours will match your home then give us a call, and we will be happy to suggest the best colour options for you.
How to install DIY roller shutters?
Installation instructions for your DIY roller shutters are available in a detailed step-by-step video as soon as your order is placed. In your order, you will receive a link to a set of videos with instructions on how to install your shutters.
We have a separate video for motorised and manual roller shutter installation, so no matter what you choose you have everything you need to be able to install the shutters yourself with no issues.
Still not sure if DIY Roller Shutters are for you?
We got you covered! We can suggest a group of experienced roller shutter installers who can complete the job for you, ensuring a high-quality finish at great prices. They offer roller shutters in Adelaide, roller shutters in Perth, roller shutters in Sydney, roller shutters in Brisbane and more.
Roller Blinds
What are roller blinds?
Roller blinds are a type of window covering made from a single piece of fabric or other flexible material that can be rolled up or down to cover or uncover a window. They are commonly used in residential and commercial spaces to control the amount of light entering a room and provide privacy.
Roller blinds are known for their simplicity, functionality, and versatility.
They are easy to install and operate, making them a popular choice for window coverings in homes, offices, and other spaces. They provide a clean and streamlined look when fully rolled up and can be adjusted to different positions to allow for varying levels of light and privacy.
What are dual roller blinds?
Double roller blinds are popular for their versatility, offering a practical and stylish solution for controlling light and privacy in residential and commercial spaces. They are a type of window covering that combines two different types of fabrics on a single roller system. They offer the ability to switch between two different levels of light control and privacy, providing versatile functionality and aesthetic options.
What are the benefits of DIY roller blinds?
One of the primary advantages of DIY roller blinds is the potential for cost savings, you can avoid paying for professional installation or custom-made blinds, which can be more expensive. Additionally, they allow you to have full control over the design and customization according to your specific window measurements.
Moreover, an additional benefit of DIY roller blinds is that they are easy to keep clean and maintain.
Fabric options for roller blinds
Depending on the needs you have for each room, there are different fabric options for roller blinds DIY:
- Polyester
- PVC
- Vinyl
Operating system options for roller blinds?
Roller blinds can be operated using various systems, depending on your preferences and requirements. Here are some common operating systems for DIY roller blinds for windows:
- Manual Chain or Cord: This is the most traditional operating system for roller blinds. It involves a chain or cord attached to the blind that allows you to pull up or down the blind to your desired position.
- Spring-Loaded Mechanism: Spring-loaded roller blinds utilize a spring mechanism within the roller tube. These blinds can be easily operated by gently pulling down on the bottom of the blind to lower it and releasing it to allow the spring to retract and raise the blind. This system does not require chains or cords, providing a clean and elegant look.
- Automated: Motorised roller blinds have a motor that allows you to control the blinds using a remote control, wall switch, or even a smartphone app. Motorized blinds are particularly beneficial for hard-to-reach windows or for individuals with mobility issues.
- Smart Home Integration: Some roller blinds can be integrated into smart home systems, such as Amazon Alexa, Google Home, or Apple HomeKit. This allows you to control the blinds using voice commands or through smartphone apps.
Do roller blinds provide insulation for your home?
Roller blinds can provide some level of insulation for your home, depending on the type of fabric or material used. In fact, roller blinds can contribute to energy efficiency and temperature control. During hot weather, using roller blinds with light-coloured or reflective fabrics can help reflect sunlight and reduce solar heat gain, keeping your space cooler. In colder months, using roller blinds made from thicker or insulating materials can help prevent heat loss and improve thermal efficiency.
How to clean roller blinds?
It is important to clean and maintain the roller blinds regularly to ensure they will last for longer.
In this case, there are two easy ways to clean internal roller blinds, either by wiping them down with a damp, soft cloth or vacuuming them.
Where can Roller blinds be installed?
DIY roller blinds can be installed in any residential and commercial space where you have good ventilation. Roller blinds offer a versatile and space-saving solution for controlling light, privacy, and temperature in any room.
However, It's important to consider the specific requirements of the installation location, such as the size of the windows or doors, the mounting options available, and any special considerations for the type of blind chosen.
How to install roller blinds?
Installation instructions for your DIY roller blinds are available in a detailed step-by-step video as soon as your order is placed. In your order, you will receive a link to a set of videos with instructions on how to install your shutters.
We have a separate video for motorised and manual roller blinds installation, so no matter what you choose you have everything you need to be able to install the shutters yourself with no issues.
Still not sure if DIY Roller Blinds are for you?
We got you covered! We can suggest a group of experienced roller blind installers who can complete the job for you, ensuring a high-quality finish at great prices. They offer roller blinds in Adelaide and roller blinds in Perth.
